
A huge pot of Sarracenia growing on a patio or deck is one of the most lovely sights I can imagine. Well, or at least, among the set of plants that you could grow on a patio, Sarracenia rank up there on the list of plants that will have a nice display over the longest period of time. If your deck or patio has six or more hours of sun during the day and your tap water is low in salts there is no excuse not to have a fine display of Sarracenia.
Light is a big factor to consider for Sarracenia. Sarracenia is a plant after all and as such it does need to have light to grow well. Lots of light. That is because the pitchers are not that great for catching light. In the wild, the plants grow in full sun and that is what they want in your back yard.
Water quality is the biggest issue in growing Sarracenia. They require a lot of water and the leaves will show salt burn if the water is too salty. If your tap water has a total dissolved solids of less than 100 PPM or you get plenty of rain during the summer and can collect it then you are in great shape. You can also use reverse osmosis water (NOT bottled drinking water) but it takes a lot. These plants each use about a liter of water each per day during the summer.
The larger the pot you use the better although at some point it could get too heavy. The pots shown are 45 cm (18 inches) in diameter. Using smaller pots for display is not recommended for two reasons. The most important reason is furry creatures. Raccoons, squirrels, opossums and other creatures are more likely to dig in and unpot plants in smaller and shorter pots looking for worms, acorns, and other yummy things in the soil. I put 3 to 4 mature Sarracenia in each pot to minimize the temptations. The second reason is larger and taller pots provide a larger soil mass to moderate temperatures and maintain soil moisture if watered once a day.
Many people grow their plants in large, undrained pots. If you do that it doesn't matter if you use ceramic or even plastic lined wood. I prefer using a flow-through water system. A flow-through system mimics natural conditions more than a stagnant undrained pot. Since I have never used undrained pots I cannot say these are better but I have never had my plants do so well. And it is not advisable to have pots on a deck draining water all the time. It damages the wood decking. I also do not like systems where open water is accessible as that invites creatures to investigate.
I have been using this system for 10 years without any problems. All I do is set my yard irrigation system to water the plants every day during the growing season and enjoy. During the winter I set the water overflow to a lower fitting so the pots drain completely. This keeps the fittings from breaking from ice and the plants a little drier. If the plants need water during the winter, I hand water them. The plants do need to be divided every two or three years.
I live in USDA zone 7 and these pots and all my other Sarracenia stay outside fully exposed to the elements all winter. These pots have frozen solid for a month and the plants survived without any problems. They were buried in snow. If there was no snow I would have covered them with row cover.
Parts list:
- Large plastic pot about 45 cm (18 inches) wide in a light color with flat sides and no holes in the bottom. The pot must have a flat area near the bottom to accept the bulkhead fitting. Do not count on being able to patch and seal a pot with a hole in the bottom.
- Plastic bulkhead fitting with internal threads. In the USA look for 3/4 inch pipe thread internal threads. The fittings are used for water and other tanks and can be found at hardware and plumbing supply stores.
- Sprinkler riser or short plastic pipe with 3/4 inch pipe threads. The riser, weed block, and pull ties make a filter to keep the soil from clogging the outlet.
- Polypropylene fiber weed block fabric, about 30 cm (12 inches) square. Water must flow through it easily but not peat and perlite. Avoid perforated plastic weed block and cloth-like totally.
- 2 long pull ties to attach the weed block to the sprinkler riser.
- Styrofoam packing (NOT biodegradable corn starch-based packing. It must be the real, non-degradable plastic.) You could also use coarse sand or gravel. Packing is much lighter and works.
- Plastic sheeting to fit bottom of pot. The sheeting keeps the plant roots out of the weed block and minimizes clogging of the weed block with lots of peat.
- Irrigation parts such as elbows, T's, and tubing to construct a water level device and to get the water to a location away from the deck or patio. The water is very acidic so pipe it to some acid-loving plants.
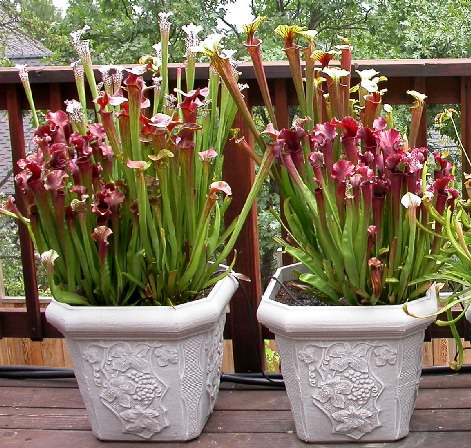
I wish I could get more of these elegant plastic pots that look like clay. The light color helps keep the soil cooler in the hot sun. (Except for the Sarracenia leucophylla, these are hybrids.)
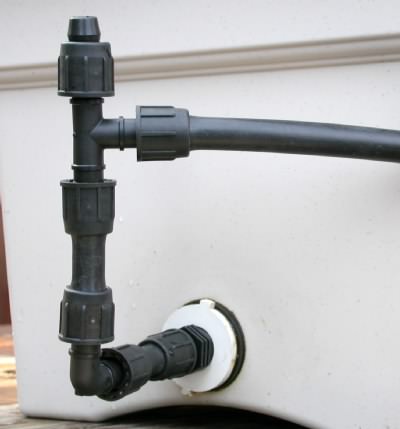
The basic design uses standard irrigation parts (except bulkhead fittings which can be hard to find). The bulkhead fitting keeps the pot sealed. The T fitting sets the water level in the pots—you must have air access at the top to prevent a siphon which would drain the pot. I use "shrubbler" or "bubbler" emitter/sprayers to distribute water on the top of the soil. The water flows through the soil and drains out the bottom.
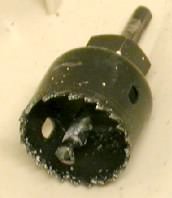 |
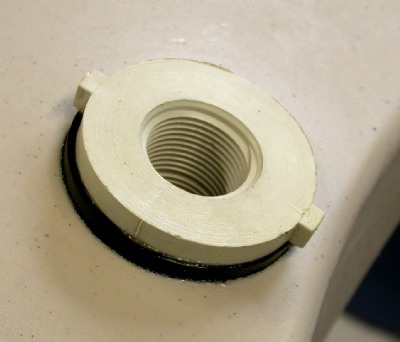
Outside view of bulkhead fitting. This kind of bulkhead fitting requires a 1 3/8 inch hole. You need a neat hole to prevent leaks so use a hole drilling bit. The fitting should seal but if you are concerned or the plastic is beaded, seal the plastic gasket with silicone grease or silicone aquarium sealer and/or put this side of the fitting inside the pot.
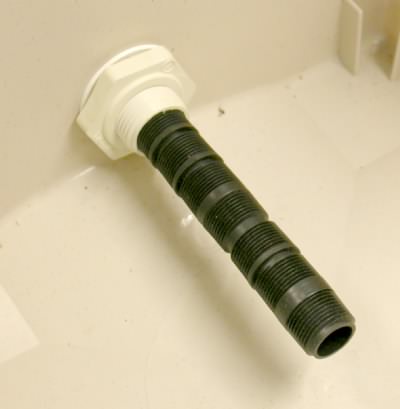
Inside the pot with a sprinkler riser screwed into the bulkhead fitting. Any kind of a pipe that reaches to the middle of the pot will work.
At this point you could also cap the riser and check for leaks.
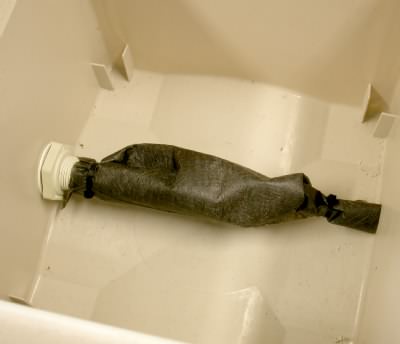
Loosely wrap the riser with weed block and use pull ties to attach weed block to the pipe near the bulkhead fitting and seal the other end.
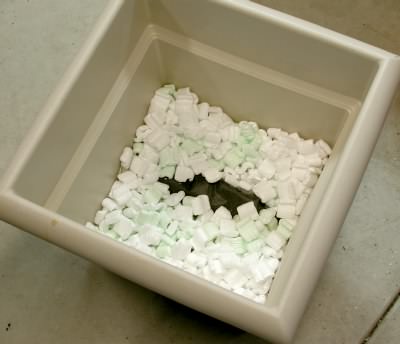
Put some Styrofoam packing material in the bottom of the pot. Make sure it is the rigid foam type and not the newer biodegradable packing. Sand and gravel also work but the foam packing is lighter. Sarracenia roots generally will not go this deep in taller 18 inch pots so there is no need to have soil at this level. However for shorter 14 and 16 inch pots it may be best to mound the Styrofoam over the drain and allow the soil mix to extend to bottom of the pot on the sides.
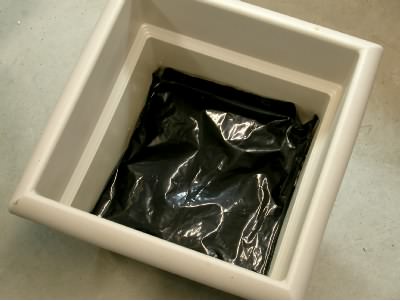
Cover the foam packing and drain with some plastic sheeting. Don't worry about water getting around the sheeting, it will.
Now you can put the pot on the deck and plant it. I use about 60% peat moss to 40% perlite by volume. This pot has room for 4 mature plants. I only put Sarracenia in these pots and keep them rather dense to minimize the chance of raccoons digging in the pots. Birds will dig in them and bury acorns but that does not hurt Sarracenia.
Set the water level in the pot with irrigation fittings. This is a male pipe adapter, elbow, and T. The T prevents a siphon from forming. The pipe running off to the right needs to be secured so the riser part stays vertical.
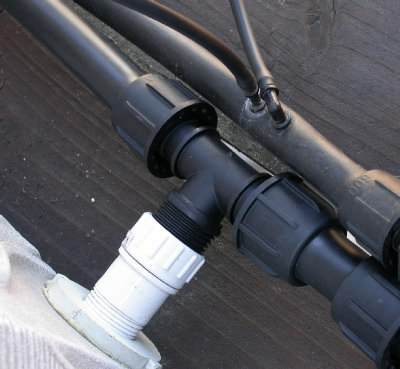
If you have multiple pots they can share one water level device. This setup uses a male pipe thread to female hose thread connector into a male hose thread T. You could also use a use a male pipe thread to male hose thread adapter to a female hose thread T. The second irrigation pipe is for watering.
If you are wondering about the nice connectors, they are Easy Loc™ fittings. Google "Easy Loc fittings" to find a supplier. They cost a little more but they are reusable and seal better than the more commonly available irrigation fittings. You need a perfect seal on this system or all the water will drip out.
 |
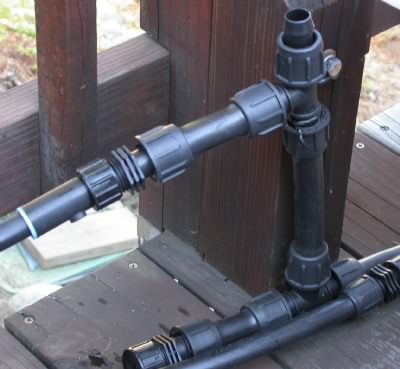
This device maintains the water level made from 2 T's and two male hose thread connectors. The lower T connects to a male hose thread connector for fully draining the system during the winter (left). The upper T sets the water level to about 4 inches (10 cm) below the soil surface level in the pots and supplies the necessary air access to keep the device from forming a siphon. The drain tube runs out to water plants that are not bothered by the extremely acidic water.

Planted pot with four multi-bud divisions. For a nicer display it works better to have the pot full of larger plants. You may need to divide the plants every other year.
I run the bubblers every day during the summer from a circuit on my irrigation system. I check the water level in the pots at the T in the water level device.
-- John Brittnacher